Sunday, April 30, 2017

Let Them Eat Cake..... May Kit Sneak Peek

Hello Crafty Friends!

Can you believe it's already the last day of April??!!! Where does the time go?!
We have a very exciting week ahead in Aunty Vera Land....
Tomorrow we reveal our May Kit - Let Them Eat Cake,,,,,, it's totally yummy!
And Tuesday we'll be telling you all about our fabulous challenge for the month of May. You won't want to miss this one!!

Today.... here's a little sneak peek at our May Kit....


Why do I suddenly feel like coffee and cake??
Can you guess what else is in the box?

xx Aunty Vera

Saturday, April 29, 2017

A Big Welcome to our newest Creative Team Member


Hello Crafty Friends!

Well, as you probably all know now, Donna is leaving us for a few months while she goes travelling around Australia (lucky Donna!!). We'll miss you heaps Donna, but wish you a fun and exciting trip.

While Donna is away, we are very lucky to have a new team member joining us.
Fun, super-crafty.... and the Queen of Flowers!
Please say hello to Suzanne.......


Hi.  My name is Suzanne and I live in Queensland with my husband and two adult children.  I love many different kinds of crafts, but my favourite is papercrafting.  I love to make cards, paper flowers, embellishments, pocket letters, loaded envelopes and much more.  I also  do some scrapbooking.  I'm very excited to be joining the Aunty Vera Scrap and Craft Creative team while Donna has a short break.  I hope I can inspire you all to make something beautiful.  I've recently started my own Youtube channel where I hope I can show people some interesting and fun craft ideas.

Here are a few photographs of some of the things that I have been making.  Thanks for taking a look. 


Explosion box


Explosion box
Journals that I have sewn signatures into

Paper flowers

Mixed media tag

Embellishments

Embellishments


See you soon for crafting fun with the May Kit!
xx Suzanne

Monday, April 24, 2017

Big News from Donna - A Trip For Me...

Hello Crafty Friends

Isn't our Creative Team just the best?! They are all so talented and inspiring and bring so much joy to Aunty Vera Land. So even though I'm really happy for Donna..... I'm also a little sad......


Hi everyone,
Well I have some exciting news for you and also some sad news, which would you like first??? 
The exciting news for me is I am going travelling for a few months and the sad news, I won't be creating with Aunty Vera while I am away; but Aunty Vera does have a surprise in store for you...
My hubby and I decided we would take our caravan and travel around Australia for a bit, while we can..


 I will be taking my crafting kit with me as I couldn't go without something to keep me sane of a night lol.  And I might even go to some classes when I can.. I have packed my inks, copics, watercolour pencils and some stamped images, though I will miss
 the excitement of 'unboxing' my kits from Aunty Vera sighhh!!
Oh why can't I take my studio with me WAH!!
Now to the part where I would like to ask you something, As we go around Australia, I was wondering if anyone from here would like to meet up for a cuppa, an afternoon of crafting or just a yak????
If you would like to, just inbox me your phone number, town and state and if we are passing through that way and staying I would love to meet up with you..
I promise I won't stalk you, I will just need to talk about my passion to someone that understands what I am saying lol..
Oh and you must be prepared to have your photo taken, after all, I will have to scrap you lol..

I will be checking in with Aunty Vera and giving you all updates of my travels
and she has even invited me for cake when I go past her place. YAH CAKE!!!
(hint: I love carrot cake with walnuts)..

Take care and happy crafting all my friends,
I will see you all when I get back..
Hugs,
Donna xx

Thursday, April 20, 2017

On the Bunny Trail: Lolly's Bunny Jar

Hello Crafty Friends!

Ready for another fun prject featuring our April Kit - The Bunny Trail?
Have a look at Lolly's super sweet bunny jar!!


Hello, and welcome to The Bunny Trail again!  This April Kit is loaded with spring colors and bunny sweetness.  I just couldn't help but try and capture some of that in this project.

I found some multicolored Easter "grass" paper at our local craft store, and I knew I had to use it, but I didn't want to make an Easter basket, so I chose a pint canning jar.  If I ever make this project again, I'll be sure to use a quart jar instead.

I used some green floral foam in the bottom of this jar to hold picks which I made from candy sticks and papers from the collection.   I stuffed the "grass" around the foam to hide it, and it became the perfect backdrop for my little bunny and extras.


Some turquoise spray paint was perfect for the lid, and I used the Santoro leaf garland and Prima flowers to accent it.


Dangling from the leaf garland is a bottlecap charm I made, using bunny images from the collection and Diamond Glaze, which is similar to Glossy Accents.


A handmade paper flower tops the lid to finish it off:


I love the way it turned out.  The colors are so perky and delightful -- guaranteed to chase away any gloominess of weather!


Thank you for taking a peek!  If you want to see more, you can find the video HERE.

And this kit is available HERE.

Hopping along,
Lolly
http://www.lollypalooza.net

Wednesday, April 19, 2017

Oops I Did It Again! .... when craft goes wrong: Lolly's Plan B

Hello Crafty Friends!

Well, our April Kit got to our Creative Team by the skin of our teeth!
Aunty Vera ordered G45 Midnight Masquerade.... TWICE!!
What else can go wrong...??.... 
 'Oops, I Did It Again' ..... or..... Have you ever had a craft project go wrong, or in an unexpected direction? And how did you 'fix' it... or what was your Plan B?
Today Lolly tells us about her Crafting Oops moments....... and oh boy can I totally relate to this!!! 


I'm thinking about projects that didn't go as planned.   I think that about sums up the majority of my projects!  Let's take a look at what a typical project experience for Lolly might look like:

I have a "thing."    I want to use this thing, but I don't know what to make with it.  I get it out and put it on my craft table so that I can think on it for awhile.

Soon, I have another "thing" and another.   My craft table is getting loaded -- OVER-loaded.   Still thinking of what to make with the things.

I start a project, but I need to sleep on it and just make sure that I'm headed in the right direction.  It sits on my craft table.

I start another project ("Look!  A shiny thing!"), and another, and my craft table is becoming a mountain of unstarted and half finished projects.  It's now the Everest of craft tables.


I see a striking resemblance between these breath-taking peaks and my mountains of crafts on the table!

Okay, back to my OOPS:   I have a new project that I have clarity on -- THIS project can practically make itself, because I know exactly where I'm headed with it and what the end goal is.   This will be the Perfect Project. Yay!   Things go smoothly, except that I lost that one "perfect" embellishment because it got buried on Mt. Everest.   I frantically search and search -- is it on the floor?  Is it under a pile?  In my frantic search, I knock more things onto the floor.  I also accidentally drag my Perfect Project into the pile of fresh E6000 glue that's on my craft table.   I try to rub the glue off the Perfect Project, only to realize that I had had distress ink on my fingers, and I just smeared it onto my Perfect Project -- on the WHITE paper and sticky areas.  I now have an area of distress-stained-E6000 rubbed onto my project.


What to do?  EMBELLISH!   Many embellishments are frankly a way to cover up a blemish.  Sometimes it works, and you'd never know that the embellishment was merely an afterthought.  I don't have any photos of the exact examples I'm mentioning, because I don't hang onto my crafts for long.  OOPS on me!

I tell myself I'll be more careful, and as my husband keeps saying, "SLOW down!"

And the most common OOPS I have, which you will soon see first hand, is that when I make loose-cover albums, I tend to punch the holes in the wrong side of the back cover.   Every time I approach the new album, I remind myself to "SLOW down!" but to no avail.  You will catch me at it again soon.  Very soon.  Because, well, I just did it again!

Hoping you have less hassle in your crafting today!
Lolly

Find me at:  http://www.lollypalooza.net

Sunday, April 16, 2017

Aunty Vera's Kitchen.... Lindt Bunny Easter Cake 2017

Hello again Crafty Friends...... I hope you are all having a lovely Easter Weekend, however you may be spending it. And being the weekend, it's time for a special Easter edition of......


Let me firstly apologize for the quality of today's images....... the pics were taken during Crazy Busy Time and I had to resort to using my phone camera.

This year's Easter Cake is from the Lindt Chocolate website....... a gorgeous semolina and almond meal cake with chopped up Lindt chocolate mixed through it and drizzled with orange syrup and chocolate ganache and decorated with mini Lindt bunnies.....


 Problem number 1 .... oops! (that's our word of the month!).... I forgot to buy the Lindt Orange Intense chocolate block needed for the cake. Lucky I still had this chocolate in my stash that our good friend Tour Guide Ted sent to Bill (sshhhh... don't tell Bill that I used it all).....


Problem number 2....... having purchased 2 bags of Lindt mini bunnies you'd think I'd have plenty to decorate the cake right? WHAT THE...!!!!??!!!


Seems I purchased 2 bags of smashed bunnies!!!! Luckily there were 5 survivors (out of TWO WHOLE BAGS!) to decorate the cake!!

The pics don't show it well, but the cake has orange syrup poured over it before being decorated with the ganache and bunnies.....


Totally YUM despite the OOPS moments!


Happy Easter (again lol) from Aunty Vera and Team xx

Friday, April 14, 2017

A Week of Easter Craft on the Bunny Trail - Donna's Clean & Simple Cards

Hello Craft Friends!

Well.... Donna is a woman after my own heart today!
Continuing our week of Easter craft........ Donna's clean and simple Easter cards.... 


Oh My Goodness, My Third project is here already..
This one is a bit different and I will tell you why!!
My sister Shirley said to me recently "why cant you make some easy cards"
I asked her what she meant as I thought I was doing easy cards, lol.
She replied, "all the ones you do have heaps of things on them, and I don't have
all the same stuff you do and I only like easy ones as my eyesight
is poor" (she is 74 after all lol)..
So for my sister and all the people who only likes easy ones for whatever reason, I have created a set of six cards using mostly what is in the kit.. And if I have used a die
you can certainty cut the same out by hand..  I have inked around all pieces
of cardstock and papers...
Clean & Simple Card Set
Card1...
I cut a piece of Lime Green cardstock and attached to the card front, then added a strip of washi tape down the left side. I used 3D foam tape to attach the 'cut-out'
a little to the left.  I also attached the fussy cut egg, bunny, chick and butterfly
with 3D foam tape after colouring them in..
Some bling, Nuvo drops, dimensional magic and glitter finishes off the
card nicely...


I love the colour of these Nuvo Drops and these images are soooo darn CUTE!!


Card 2...

If you watched my unboxing video on youtube, you will know this piece of
Ephemera; as soon as I seen it I knew it was destined for a card. lol

I cut a mat from a piece of patterned paper and using 3D foam tape
adhered the Ephemera piece on top.
I stamped the Happy Easter banner and fussy cut it and attached it
using 3D foam tape. I die cut a banner (you can do this piece by hand)
and again attached it with 3D foam tape..
Dimensional magic and glitter is all it needed to finish... 


Card 3...

I just love this border with the three chicks, so decided this was the piece I was going to use for a card.  I matted it onto a blue piece of cardstock, cut a small strip of contrasting patterned paper (scrap) and adhered it above the chicks.
I placed a piece of washi tape along the top (love this stuff) and
again using 3D foam tape adhered the eggs Ephemera on top of it.
A banner underneath finishes the card with a little glitter.


Card 4...

Matting bright pink cardstock to the left allowed me to fit the leaf ribbon on the right.
I added the cut-out with 3D foam tape and placed the two corners on the left. (you can hand cut corners if you don't have a punch or die). The tiny Flowers on the
leaf ribbon looks wonderful.. Add some bling and that's it.. 


Pretty as don't you think...


Card 5...

I just love this little card..

 I matted some bright yellow cardstock across the card front, added a strip of washi tape on the top and bottom of the mat then a strip of patterned paper (scrap) on each side.  I attached the cut-out with 3D foam tape, added the notes tab Ephemera and
finished of with a gold pearl on the Easter ribbon..


Card 6...

I used a bright Orange mat for this lovely card with washi tape on the top and bottom.
Then I attached the cut-out with 3D foam tape. After inking around the edges
of the banner I attached these and the Happy Ephemera also with foam tape.
Some Nuvo Drops on the flowers make for a simple but lovely card... 


I love how the Nuvo Drops stay raised..


... All six cards ...


My three projects together..


.......................................................

CURIOUS TO KNOW WHAT IS IN AUNTY VERA'S APRIL BOX?
- Watch my Aunty Vera's April Unboxing HERE

- Check out my BLOG HERE 

BUY Aunty Vera's Monthly Kits HERE

March Monthly kit is available for $75 which is a saving of 20% on buying the items separately.

Postage is $8.50 anywhere in Aus.
For internationals, please email for accurate prices.

C O N T A C T:
info@auntyverascrapandcraft.com.au

 ................................

I hope I have inspired you to create Glorious things..
Thank you for stopping by..
Hugs
DONNA xx


Thursday, April 13, 2017

A Week of Easter Craft on the Bunny Trail: Lolly's Memory Dex Box Construction

Hello Crafty Friends!

Did you just love Lolly's Easter Rolodex Cards earlier this week?
And did you say to yourself "but where are you going to put them Lolly?
Well Lolly made a box of course!!
Enjoy..!......


I'm "springing" into action with this kit.  In project #1, I made a set of Memory Dex cards, and now I'm constructing my own box for them.  This box is sitting on my desk, and every time it catches my eye,  I think how perky and uplifting those colors are!

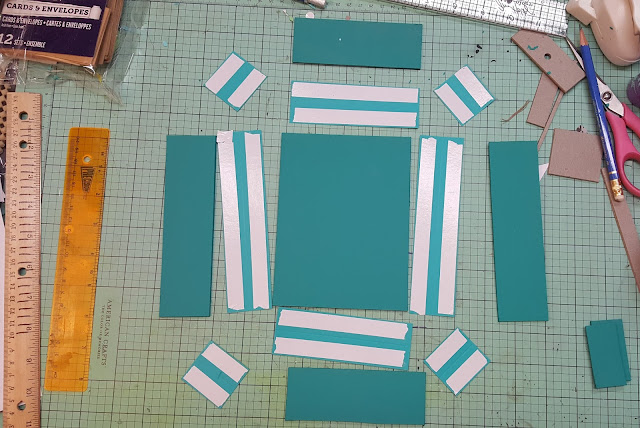
I cut chipboard in these sizes and painted them (all measurements are in inches):
One base  4 1/2 X 6
Two long sides:  1 5/8 X 6 1/8
Two short sides:  1 5/8 X 4 1/2
Two runner guides:   1 x 2


Then I cut paper hinges:
Two at 1 1/2 X 6
Two at 1 1/2 X 4 1/2
Four at 1 1/2 X 1 5/8


I attached all the sides of the chipboard with double sided tape and Glossy Accents, then I used papers to cover each of the four sides ( two at  4 1/2 x 2 1/4, two at 6 x 2 1/4).


Once done, I used a border strip from the paper collection to go all the way around the box, and it really made this project come alive!  I also added that GORGEOUS polka dot paper on the inside bottom.  Note -- the inside of the sides remain painted with no paper.


I painted some large wooden beads to glue on as feet on the box, and they are so cute and stubby!


The runners are 1/4 inch wide dowel rods which I sanded and attached using the 1 x 2" runner guides.


Then some Kit Love to the front of the box, stuffing my cards inside, and it's DONE!  I am totally in love!


For the full detailed tutorial, please check out my video HERE.
and be SURE to check out this awesome, awesome April Kit.

Thanks for "hopping" by!
Lolly


http://www.lollypalooza.net
Related Posts Plugin for WordPress, Blogger...