Wednesday, August 30, 2017

Lolly's Color Burst Backgrounds

Hello Crafty Friends

Let's finish up our month of crafty fun with a burst of colour!
Today Lolly creates some fabulous cards with Color Burst backgrounds. Just gorgeous!
Enjoy!!..........


I have been looking forward to playing with the Color Burst, and I finally got some play time!

This first card is mounted on kraft card stock and layered with ribbons, buttons, and word cut-aparts from the kit, plus an adventure badge image I bought from Silhouette Design Store.


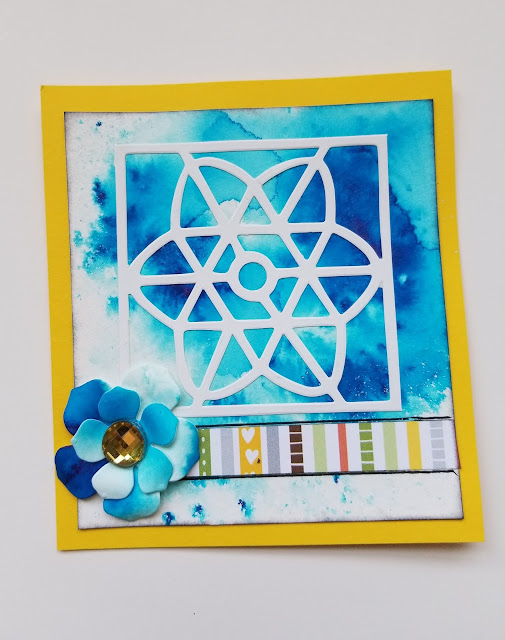
On this one, I added a white lacy die cut that was a gift, and I also die cut some flowers from another piece of color-burst background.   Loving those flowers!  A little strip of leftover BoBunny paper and a yellow mat bring it to life.


 I think this is my fav!  It's so simple.  I embossed a circular "thank you" stamp onto the watercolor paper before playing with the color burst, and the embossing resisted the color.  Once dry, I stamped in the middle with Lawn Fawn premium ink pad in jet black, which is accented even more by the black mat.


I cut apart this background into three strips and mounted them with space between them before adding elements from the kit and a digital compass that I designed.


And lastly, this card has a paper lace and ribbon strip, and a word strip and flower from the kit!   The flower is a beautiful addition to the black and blue look.


I filmed the process of playing and making backgrounds.  You can watch HERE.

The color burst and other KIT supplies can be purchased HERE.

I hope you enjoyed that little BURST of color!
Lolly

http://www.LollyPalooza.net

Saturday, August 26, 2017

Going on a Bear Hunt - Suzanne's 3 Teddy Bears Picnic Baskets

Hello Crafty Friends!
I hope your weekend is off to a relaxed and crafty start.
Today Suzanne takes her bears on a little picnic.... complete with picnic baskets to hold all their bear treats!
Enjoy.....


The August kit from Aunty Vera Scrap and Craft is all about going on a Bear hunt, but I wanted to change it up a bit and have a teddy bears picnic instead of a Bear Hunt.   So here are my picnic baskets made with some paper from the Bobunny Weekend Adventures collection from the August kit.

I made a few basket all different sizes.  Two of them are made with dies that I own and the other two are just made using a scoreboard and scissors and it is really very easy.

Basket 1.
The first basket I made is the largest basket and I used my sizzix bigz die.  I used some cardstock to cut all the pieces and then I cut it out again with the BoBunny paper from the August kit and glued the paper to the cardstock.

I used the sizzix bigz die to cut the carkstock

I also cut some of the weekend adventures papers from the August kit

glued the paper to the cardstock
Once the glue has dried you can fold the pieces ready to glue them together
fold on the score lines
glue it all together
the basket put together

construct the handle
I used brads on each side of the handle so that the handle can move and then glued this to the basket side
the finished basket

Basket 2
The second basket I made is the middle sized basket, and for this one you will only need your scoreboard and scissors.
First you need a 6 x 6 inch piece of paper.  Score this at the 2 and 4 inch mark.  turn 90 deg and score at the 2 and 4 inch mark again so that your piece of paper is divided into 9 equal sized squares. 

scored at 2 and 4 inch
Cut up two sides to the 2 inch marks on two sides as shown below
Next cut each of the end squares in half also down to the 2 inch mark.

For the centre section, mark the middle then draw a line to the intersection and cut these pieces out so that you have a triangle shape left.  Draw some lines on the four inside flaps about 1/4 inch down and cut these pieces off also.

here you can see the lines that have been drawn 1/4 inch down the inside flap.  This has to be cut off.

1/4 inch piece has been cut off the four inside flaps
Now fold all the score lines and fold the two longer outside pieces together.  They should overlap.  Depending on how big and open you want your basket, will depend on how much you overlap these flaps.

flaps overlapped and glued together

now fold the two shorter flaps up over the already glued outer flaps.  They will go up over the edge of the basket but they will later be cut off.

Now fold the triangle piece up on the outside.  It will also go up over the edge of the basket.  You can now cut these overlapping pieces off in line with the top of the basket.
Cut two 1 1/4 inches circles and fold them in half to cover over the edges of the folded up pieces


For the handle, cut two 1/2 inch x 6 inch pieces of card and punch holes in both ends about 1/4 inch from both ends


Punch holes down about 1/4 inch from the edge of the basket on both sides of the basket and attach the handles with brads so that they will move.  You can round the end of the handles if you want to.


Here is the finished basket


See the video link below for how to make this basket.


Basket 3
The third basket is also made with a die and is super simple.  I used the paper from the August kit to make this basket.  You have to cut the die twice and glue it together.


glued together
Add the handle with brads so that it can move.
the finished basket

Here are the three finished baskets with teddies


Now just for the fun of it I made another basket.  It is a very small basket made in the same manner as basket 2.  I made it with a piece of paper that was 3 inches x 3 inches because Tiny Teddy wanted to get in on the action and so I decided to do a photoshoot with tiny teddy and some gorgeous little resin food pieces that I purchased recently.  I just thought it was too cute for words.  Hope you like it.


Here is tiny teddy on his picnic rug with his basket of yummy goodies.  He just needs a friend to help him eat it all.


You can see the video on how to make basket number 2 HERE.

You can get the August kit from Aunty Vera Scrap and Craft HERE.


xx Suzanne xx


Friday, August 25, 2017

Going on a Bear Hunt: Lolly's Photo Box

Hello Craft Friends!

Today Lolly finds a plastic recipe card box and .... with the help of a few bears.... turns it into a fabulous photo and Project Life Card box with super fun divider cards!
Enjoy!!.....


You know me -- I am a sucker for thrift store shopping.  Recently I found this plastic box that had recipe cards in it.  There are six clear acetate sections, so I thought I'd use this for  "Project Life" sized cards.  They fit perfectly!


For my project, I decided to film the process of making twelve tabbed dividers to organize the cards.  I guess I'm a glutton for punishment, since it's super hard to take over an hour of video and condense it down -- even down to just 40 minutes!

I started by cutting six of the adorable patterned papers in this month's kit into 4 X 6" size, and then I made colorful tabs to glue on each.  I love the contrast of the tab against the  papers!


For the first set, I chose this sweet bear and fox paper.  Divider one has cut-aparts from the papers plus some of the resin embellishments in the kit.   Divider two has that sweet die cut bear from the kit.  I love that the die cut sign allows us to write what we want on it!  Some kit ribbon across the top added to the fun.


For the second set, I used the picnic papers.  This die cut bear gets around!   He's back, begging for "hunny" on divider one.  On divider two, I used the word cut-aparts and some silverware from digital images I designed.


On the third set, it was time to get out that ice cream truck-themed paper!  That little truck is so fun, and it definitely reminds me of my childhood. I used a digital fence I created and a cute puppy stamped image on divider one, then paper cut-aparts, sewing, and a 3D ice cream sticker on divider two.


Next up is the foxy paper for the fourth set.  The bear family stickers in the kit made an amazing and quick card for divider one.  Those bears almost come to life!  I kept it simple for divider two, letting the fox image stay the focus while adding word cut-aparts and boot print stamp images.


The fifth set is with the beach paper! This is such a sweet birds-eye view of beach goers. I grabbed some of my solid card stock to die cut flower petals and added those word cut-aparts on divider one.  Those word cut-aparts have been the staple of my crafting!   For the second divider, I used the 3" square cut-apart and centered it, with a little stitching on it, too.


For the last set, I used the floral paper.  I had a bear stamp that I wanted to use for the first divider, but I wanted him to match the colors, so I made him an aqua color.  You can see that he's super happy with the flowers I gave him to smell!  On the last divider, I focused on the cut-aparts and a compass  that I designed.  I thought with all this adventuring, we need a compass to keep us centered!


I ended up adding some of the ribbon to the base of the box for added color, and I cut up a few cards for journaling or as photo mats.


 Lastly, I colored the picnic bear stamp for a journaling card.  I knew that stamp had to go in this box.


Ophelia wanted to give this project a "thumbs up" but alas!  She has no thumbs, so she gave it a "paw up" instead.  She's a bare little bear without her new necklace, but it was drying after the attachment of a clasp.


I condensed this process as much as possible, but in the end I had to break it down into two parts.
You can see part one HERE and part two HERE.

Thank you for going on this long bear hunt with me.  Make sure you check out these amazing crafting supplies HERE.


Bearly crafting,
Lolly
http://www.LollyPalooza.net


Tuesday, August 15, 2017

Going on a Bear Hunt - Suzanne's Two Mixed Media Tags

Hello Crafty Friends!

Welcome to another crafty week of Bear Hunts and Weekend Adventures!
Today, Suzanne creates a pair of gorgeous mixed media tags.
Enjoy!


Hello everyone.  The beautiful August kit from Aunty Vera Scrap and Craft is a treasure trove of wonderful crafty bits and pieces and the fabulous BoBunny Weekend Adventures papers.  For this project I have decided to make two mixed media tags.

I cut two large tags from chipboard and painted both of them with gesso several times.  I then gave them a light wash with the Ken Oliver Color Burst Cerulean Blue and water.

I used the sizzix bigz L tag die for the tags.

I  mixed some of the color burst Cerulean Blue with some texture paste and used a palette knife to put a border around the outside of the tags

a mixture of colour burst Cerulean Blue and texture paste

mixed together

I used a palette knife to smear the texture paste around the tags

I cut two more tags from the 'road trip' (reverse side) which is a lovely yellow background with small houses all over it.

two yellow tags from the August paper collection

I cut about 2mm off each side of the tag before I distressed all the edges of the yellow tags so that you would be able to see the blue textured background of the bottom tags.

distressed edges


I glued these distressed tags on top of the other tags

Yellow tags glued to the base tags
I then painted the yellow paper with translucent gesso so that I could add paints, etc to this layer without it soaking into the paper,

Translecent Gesso is very helpful when you want to add paint to a layer but don't want it to soak into the paper underneath

I made a wash with the Cerulean Blue and the Chartreuse and coloured some cardstock for the leaves for these tags.


coloured cardstock for the leaves
I used a stencil and texture paste to add some texture to the tags in random places

stencil and texture medium
 I made of mixture of water, Cerulean Blue and Gesso to splatter the tags with


I splattered the tags with the gesso mixture using a fan brush


I used some skeleton leaf dies and some swirly leaf dies to add to the tags


I also used the beautiful Prima flowers which were in the August kit.


I found two sentiments from the paper collection to add to each tag.  "Bring on the sunshine" and "Stop and smell the flowers".  I layered each sentiment on some cardstock that I had coloured with the Cerulean Blue Color Burst


I then started layering some of the diecuts onto the tags


I also coloured some gauze with the color burst - both Chartreuse and Cerulean blue and layered the sentiments on some foam tape before adding them to the bottom of each tag.


Then, it was time to add the prima flowers from the kit and I also added a few from my own stash that I had made previously.  I always lay these elements out and arrange them how I would like them to look before gluing them down.


I then added two yellow bling pieces from  the Docrafts "pocket full of posies" to each tag and some of the yellow ribbon from the Docrafts "folk flora" ribbon pack. Both are from the August kit.

Here are the finished tags


Here are the two finished tags


Thank you so much for having a look at my tags.

You can see the video of how I made these tags HERE.

You can get the August kit from Aunty Vera Scrap and Craft HERE.

Related Posts Plugin for WordPress, Blogger...